Everyone is tired of shared hosting because of downtimes and very less control over our server. When we host our website on shared hosting, Actually, We are sharing our server with tens of other shared hosting users.
It means, we only get the small amount of resource of the server. For example, If shared hosting company has 1 server with 16GB of RAM, they will simply host 16 websites on the server and you will get 1GB of RAM too and shared computing power.
 It also means that if any of those websites is doing something fishy, your website will be affected too. For instance, If someone is sending spam Emails and the IP address of the server gets blacklisted on Gmail or Yahoo, The Emails sent by your website will be listed in the Spam folder too, because you are sharing the same IP address.
Average shared WordPress hosting will cost you around $5 to $15 per month. I have good news for you! Now You can set up your private WordPress hosting for less than $10/month. Considering you are getting constant traffic, this setup will handle thousands and thousands of visitors on a daily basis without affecting the speed of the website at all.
In this article, we will setup a Wordpress website on a cloud server or VPS with SSL certificate that will never actually expire, in less than $10/month. To be more specific, I am going to use a cloud server from vultr with 1GB RAM and it will cost me $5/month. If you are getting more than 5,000 page looks a day, a cloud server with 1GB RAM is recommended. You can get it for $5/month.
To manage this web server, We are going to use ServerAvatar. It is a management panel for Cloud Servers. Using ServerAvatar, we will be able to configure our server and install Wordpress websites with ease (We won’t even touch command line at all). The reason we are going to use ServerAvatar is that we can speed up the configuration process (It takes hours to set up a server otherwise) by a huge factor (3 minutes to configure and 5 minutes to set up our website).
So, Here are the steps to setup your private WordPress hosting for less than $10/month.
Believe me; this process will not take an hour! You can also set up multiple websites on your own server in seconds. Also, you can monitor activities on your server (We’ll see it later).
So, Without wasting any more time, Let’s get started with the process.
When you first create an account in any of these websites, you will have to top-up your account so that you can get started! Just top-up your account with $5 because it’s the minimum value to top-up for the first time.
Once done, Click on the Servers section given in the sidebar and then click on the + button given on the right side of the screen just like the following image.
 You will be redirected to a page with multiple options. Don’t panic, Here is how you are going to deal with those options.
If you are using the server provided by other companies like Digitalocean or Linode, Server creation process will be almost same. The only difference will be termed.
Now, Click on the Deploy button and your server will be ready in 2-3 minutes! Once it’s ready, you will see Status as Running just like the following image.

Once your account is ready, top-up your account with some amount to get started. Minimum amount to top up is $1 and if you want to pay on a monthly basis, Top-up your account with $4.
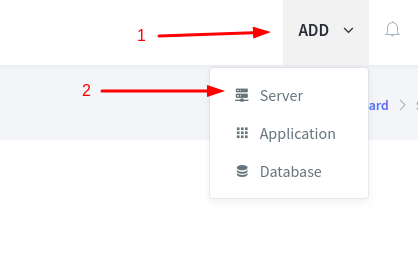
After that, click on the Add drop-down given in the top-right corner of the dashboard and select Server just like the following image.
 You will see a form containing three fields for Server Name, IP address and root password. This information is provided by Server provider. In case if you are using Digitalocean, you will get this information in the Email just like this.
 In case if you are using Vultr or Linode, you can find information on your control panel or dashboard. I am using Vultr for this guide and I can find information by clicking on the Server name on Instances section.
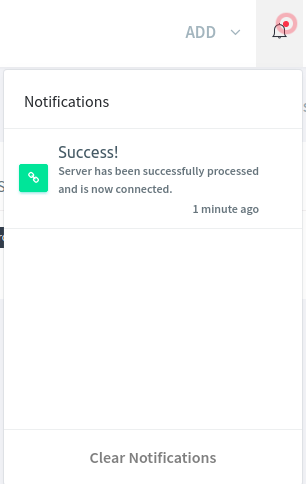
Just fill up the information and click on the Add server button. You will get a notification once your server is configured and ready to use just like the following image (You can also see the progress on Dashboard).
 Click on the notification and you will be redirected to a server panel! Server panel will show basic information about your servers like Memory usage, Disk usage and Server load. Also, these values are monitored and presented in a beautiful graph so that you can know what’s going on at any given time. Server panel looks like the following image.
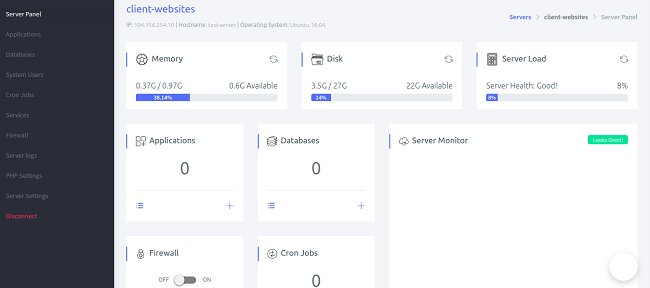 Initially, you won’t see anything in Server monitor because your server is brand new. ServerAvatar will monitor the health of your server every 15 minutes. So, you will start getting to see usage graph in Server Monitor.
The first thing you should do on your server is to turn on the firewall. It is very easy. Just click on the switch given in the Firewall card on the server panel and firewall will be enabled on your server.
Now, Click on the Add button from the top-right corner of the panel and select Application. You will be asked to select the server. Currently, We just have one server, so we will select a server and click on create an application. You will see a form with some fields that look like the following image.
 First of all, Enter the application name which is used to identify the application on a server and enter the domain/subdomain you want to host on the server. Make sure that the domain or subdomain you are adding is pointing your server.
In Application type, Select Wordpress. Once you select WordPress, you will see three more fields are revealed in which we will enter Wordpress information like the title of the blog, admin username and admin password. Fill the information and your form should look like the following image.
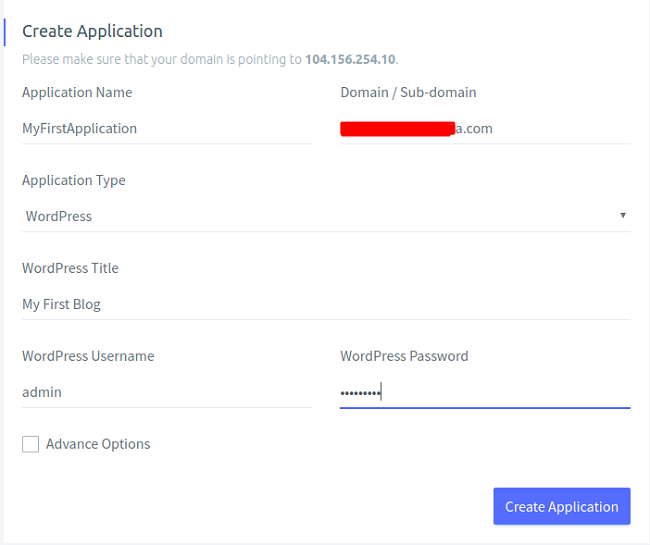 Once you’ve entered the necessary information, click on the Create application button and ServerAvatar will create an application for you in less than 15 seconds.
Once the application is ready, you will be redirected to the application dashboard that will contain information like FTP credentials, Graphs containing the history of the application’s response time and load time. Application health is checked every 5 minutes if you are using ServerAvatar. You will be notified within 5 minutes if something goes wrong on your application.
Now, We want to install SSL Certificate in our application. ServerAvatar provides one-click SSL certificate configuration. To install an SSL Certificate, Click on the SSL Certificate section given in the sidebar of an application dashboard just like the following image.
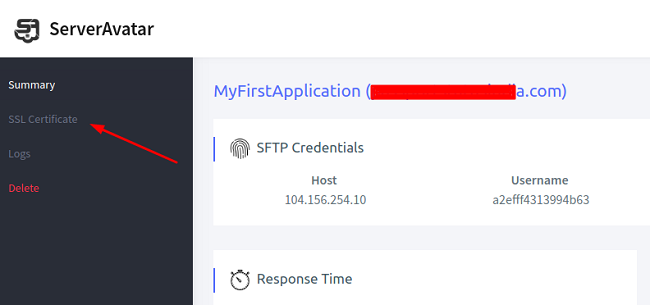 In the SSL Certificate page, you will be able to manage the SSL Certificate of your Application. If you don’t have SSL Certificate installed, you will see an option to install it. If it is already installed, you will get an option to enable HTTP to https redirection, Update SSL Certificate (Only if you have installed custom SSL certificate) and Uninstall SSL Certificate.
If you haven’t installed SSL Certificate yet, you will see something like this:
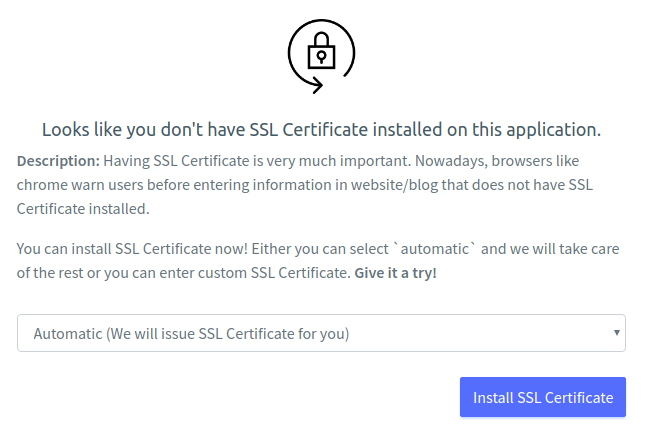 To issue and install SSL Certificate automatically, Select the Automatic option from the drop-down and click on Install SSL Certificate. If you want to install custom SSL Certificate, select Custom from the drop down and enter the certificate information. Once the SSL Certificate is installed, You will see options like this.
 If you are installing SSL certificate for the first time on the server, it will take about 2 minutes to configure the server to issue and configure SSL Certificate. Otherwise, it will take less than 30 seconds to issue and configure SSL Certificate on your application. After that, simply choose any free Wordpress theme from the store or check out premium WordPress theme from Codester.
So, this is how you can create private Wordpress hosting capable of managing multiple websites on a single web server and monitoring them. And we have spent less than $10 till now ($9 including taxes to be more specific).
It will take seconds to upgrade a server with higher memory and computing power. ServerAvatar will configure it accordingly and you will have an upgraded server ready to handle more and more traffic in minutes. You can even divide your WordPress application into two servers using ServerAvatar.
If you already have a website on shared hosting and want to migrate it to use Cloud server with ServerAvatar, you can contact ServerAvatar’s support team at support@serveravatar.com and they will migrate your site for you to this setup without downtime. If you have questions, you can comment them down in the comment section and we will respond back as soon as possible.
It means, we only get the small amount of resource of the server. For example, If shared hosting company has 1 server with 16GB of RAM, they will simply host 16 websites on the server and you will get 1GB of RAM too and shared computing power.
Average shared WordPress hosting will cost you around $5 to $15 per month. I have good news for you! Now You can set up your private WordPress hosting for less than $10/month. Considering you are getting constant traffic, this setup will handle thousands and thousands of visitors on a daily basis without affecting the speed of the website at all.
In this article, we will setup a Wordpress website on a cloud server or VPS with SSL certificate that will never actually expire, in less than $10/month. To be more specific, I am going to use a cloud server from vultr with 1GB RAM and it will cost me $5/month. If you are getting more than 5,000 page looks a day, a cloud server with 1GB RAM is recommended. You can get it for $5/month.
To manage this web server, We are going to use ServerAvatar. It is a management panel for Cloud Servers. Using ServerAvatar, we will be able to configure our server and install Wordpress websites with ease (We won’t even touch command line at all). The reason we are going to use ServerAvatar is that we can speed up the configuration process (It takes hours to set up a server otherwise) by a huge factor (3 minutes to configure and 5 minutes to set up our website).
So, Here are the steps to setup your private WordPress hosting for less than $10/month.
- Create a cloud server (Using Digitalocean, Vultr, Linode, etc.)
- Connect a server with ServerAvatar
- Install a Wordpress website with SSL Certificate
Believe me; this process will not take an hour! You can also set up multiple websites on your own server in seconds. Also, you can monitor activities on your server (We’ll see it later).
So, Without wasting any more time, Let’s get started with the process.
Create a cloud server
Many companies provide instant cloud servers. Some of them are Digitalocean, Vultr and Linode. You can create an account in any of these websites and get your cloud server ready in minutes. I have created an account in Vultr and I am going to create a cloud server in vultr. Here is how the process looks like.When you first create an account in any of these websites, you will have to top-up your account so that you can get started! Just top-up your account with $5 because it’s the minimum value to top-up for the first time.
Once done, Click on the Servers section given in the sidebar and then click on the + button given on the right side of the screen just like the following image.

- Server Location: If you want a 512MB server for $2.5, select Miami. Otherwise, select the best location based on your traffic. If you are getting more traffic from the USA, selecting the USA based data center is best for performance. Similarly, if you are getting more traffic from Australia, Select a data center that is based in Australia.
- Server Type: Select Ubuntu with version 16.04 x64.
- Server-Size: You can select the plan you want. ServerAvatar supports servers with any size. For this example, I am going to select $5 plan with 1GB memory.
- Additional Features: Here, you can select Automatic backups if you want. Otherwise, everything is optional here.
- Startup script: It’s completely your choice. I am not going to upload any startup script because I don’t need it. Startup scripts are rarely used for custom configurations.
- SSH keys: If you want to add your SSH key, you can! If you don’t know what SSH key does, skip this option too.
- Server Hostname and label: It’s the name of your server. You can enter anything you want. In this case, I will simply enter test-server.
If you are using the server provided by other companies like Digitalocean or Linode, Server creation process will be almost same. The only difference will be termed.
Now, Click on the Deploy button and your server will be ready in 2-3 minutes! Once it’s ready, you will see Status as Running just like the following image.

Connect Server with ServerAvatar
Now, It’s time to create an account in ServerAvatar to manage this server. Click here to create an account in ServerAvatar.For our readers, there's a special discount of 10%. Simply use coupon code CTRICKS10 during checkout to avail 10% discount on ServerAvatar.To create an account, you just have to enter your Email address and password. You will receive Email verification link to verify your Email address.
Once your account is ready, top-up your account with some amount to get started. Minimum amount to top up is $1 and if you want to pay on a monthly basis, Top-up your account with $4.
After that, click on the Add drop-down given in the top-right corner of the dashboard and select Server just like the following image.


Just fill up the information and click on the Add server button. You will get a notification once your server is configured and ready to use just like the following image (You can also see the progress on Dashboard).


The first thing you should do on your server is to turn on the firewall. It is very easy. Just click on the switch given in the Firewall card on the server panel and firewall will be enabled on your server.
Install a Wordpress website with SSL Certificate
Now it’s time to create a website on our server! Considering we are doing all these on Cloud server, We are very fast! It is very easy to create a Wordpress website using ServerAvatar. First, make sure your domain is pointing to the right server. You have to update nameservers and put host as your server’s IP address in the domain’s main A record.Now, Click on the Add button from the top-right corner of the panel and select Application. You will be asked to select the server. Currently, We just have one server, so we will select a server and click on create an application. You will see a form with some fields that look like the following image.

In Application type, Select Wordpress. Once you select WordPress, you will see three more fields are revealed in which we will enter Wordpress information like the title of the blog, admin username and admin password. Fill the information and your form should look like the following image.

Once the application is ready, you will be redirected to the application dashboard that will contain information like FTP credentials, Graphs containing the history of the application’s response time and load time. Application health is checked every 5 minutes if you are using ServerAvatar. You will be notified within 5 minutes if something goes wrong on your application.
Now, We want to install SSL Certificate in our application. ServerAvatar provides one-click SSL certificate configuration. To install an SSL Certificate, Click on the SSL Certificate section given in the sidebar of an application dashboard just like the following image.

If you haven’t installed SSL Certificate yet, you will see something like this:


So, this is how you can create private Wordpress hosting capable of managing multiple websites on a single web server and monitoring them. And we have spent less than $10 till now ($9 including taxes to be more specific).
Conclusion
The benefit of this setup is, you can create a highly scalable application. For instance, if you are on shared hosting and your traffic raises like crazy, you won’t be able to handle that much load and your applications might face downtime but it’s not the case with this setup.It will take seconds to upgrade a server with higher memory and computing power. ServerAvatar will configure it accordingly and you will have an upgraded server ready to handle more and more traffic in minutes. You can even divide your WordPress application into two servers using ServerAvatar.
If you already have a website on shared hosting and want to migrate it to use Cloud server with ServerAvatar, you can contact ServerAvatar’s support team at support@serveravatar.com and they will migrate your site for you to this setup without downtime. If you have questions, you can comment them down in the comment section and we will respond back as soon as possible.
0 Response to "How to Set up Private Wordpress Hosting for Less than $10/month"
Post a Comment